Supabase for C#: Streamlining Backend Development with Database Magic
Unlocking Backend Magic: Simplify C# Development with Supabase!

Photo by Tobias Fischer on Unsplash
Are you a C# developer looking to simplify your backend development process? Supabase is a powerful backend-as-a-service platform that brings the magic of databases right to the forefront of development! Say goodbye to tedious backend setup and focus on what you do best – crafting exceptional applications.
In this beginner's guide, we'll delve into the fascinating world of Supabase, exploring how C# developers like you can harness its potential. Whether you're working on a big or small application, Supabase may be worth looking into.
What is Supabase?
Supabase is a game-changer for developers seeking a seamless backend solution. By exposing PostgREST database API endpoints, it allows you to replace the conventional backend with ease. Additionally, Supabase offers client libraries in JavaScript and Flutter, catering to a wide range of developers. And for all you C# enthusiasts, there's fantastic news! An open-source community client library exists, leveraging models to automatically generate database requests.
Throughout this blog post, we'll dive into the essential aspects of integrating Supabase into your C# project. With a practical example based on a school database schema, we'll explore the core concepts step by step. Whether you're a seasoned C# developer or just getting started, this guide will pave the way to harnessing Supabase's potential in your projects.
Connecting to Supabase
Before diving into using supabase-csharp, you need to set up a Supabase project. Head over to the Supabase website (supabase.io) and create an account if you haven't already. Once logged in, create a new project and obtain your project's URL and public key, which you'll use in your C# application.
Firstly, we need to install the supabase-csharp NuGet package either via the command line or via the NuGet Package Manager:
dotnet add package supabase-csharp
Now we need to create a new Supabase client with our URL and key:
var supabaseUrl = "<supabase-url>";
var supabaseKey = "<supabase-key>";

var supabase = new Supabase.Client(supabaseUrl, supabaseKey);
await supabase.InitializeAsync();
From here, you can use the Supabase client to perform CRUD operations on your database. Depending on the structure of your project, you can create the client anywhere you like. If you're using Dependency Injection, consider creating the client and injecting it within the Program.cs or Startup.cs files:
var supabaseConfiguration = builder.Configuration
    .GetSection("Supabase")
    .Get<SupabaseConfiguration>(); // A class used to hold the configuration

builder.Services.AddScoped<Supabase.Client>(
    provider => new Supabase.Client(supabaseConfiguration.Url, supabaseConfiguration.Key));
The Supabase URL and key can be found by navigating to Settings and then selecting API in the left-hand menu.
Representing tables with Supabase
Supabase C# works by creating models representing tables that are used to generate queries to run against the Postgres database. Let's start with a simple student table.
A note on RLS*: when creating tables in Supabase, I turned Row Level Security (RLS) off as there is no authentication on my command line application and leaving it on will result in no rows being returned. Turning off RLS will allow anyone to access the tables, so be warned.*
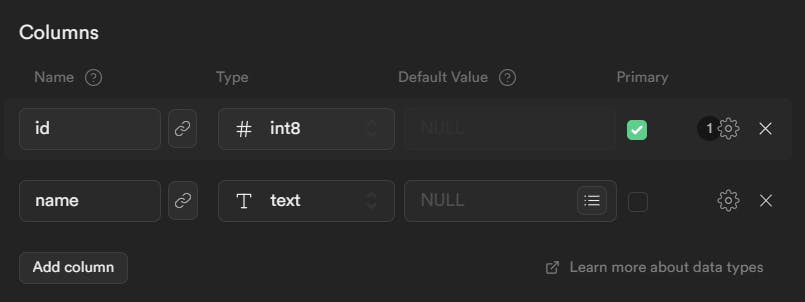
In a Supabase project create a students table with an id and a name column:

The id column is the primary key and the name column is a text field that cannot be null. You can change this using the cog icon to the right. Now create a Models folder in the root of your project and within it create a Student model class:
using Postgrest.Attributes;
using Postgrest.Models;

namespace SchoolSystem.CLI.Models;

[Table("students")]
public class Student : BaseModel
{
    [PrimaryKey("id")]
    public int Id { get; set; }
    [Column("name")]
    public string Name { get; set; } = string.Empty;
}
This class represents a single row in the students table.
Every model must inherit from the
BaseModelwhich comes fromPostgres.Models.The class must use the
Tableattribute with the name of the table in the database.Attributes are used to map the model's properties to the appropriate columns in the database. You can name these C# properties anything you like so long as the names of the columns are correct in the attributes.
Querying a table
First, we will simply select all the students from the table. Add some data to the students table via the Supabase interface. Note, you will not have to add the id as this is automatically created by the database.
var response = await supabase
    .From<Student>()
    .Get();
We use the .Form<TModel>() method to tell Supabase what table we are working with and then use the Get() method to fetch all of the rows in the table.
The response is of type Postgres.Responses.ModelResponse<Student> and has a Model and Models property that can be used to access the resultant data. We are expecting a list of students, so we will use the Models property like so:
foreach (var student in response.Models)
{
    Console.WriteLine($"Student with id {student.Id} has name {student.Name}");
}
If we would like to fetch a specific student, we would need to apply a filter on the Supabase client and then use the Model parameter instead of Models.
var response = await supabase
    .From<Student>()
    .Where(s => s.Id == studentId) // Filter based on the student's Id
    .Get()

if (response.Model is not null) {
    // We can access the student model from the response
    Student student = response.Model;
}
As it is possible that no student exists with the given id, we must first check that the Model is not null before accessing it. Alternatively, if we are fetching a single item, we can fetch the Student model directly using the .Single() method:
Student? student = await supabase
    .From<Student>()
    .Where(s => s.Id == studentId)
    .Single();
Again, a student with the given id may not exist in the database and so we will need to verify that the student is not null.
Inserting new records
Inserting a student into the database is also relatively simple:
var student = new Student { Name = name };
await supabase
    .From<Student>()
    .Insert(student);
First, we create a new student model to be inserted. We only need the name as the id will be automatically generated by the database. We still use the From method to indicate the table we are working with and then we use the Insert method to insert the record into the database.
Updating a record
We can update a record by changing its properties and then passing the record to the Update method:
Student student = await supabase.From<Student>()
    .Where(s => s.Id == studentId)
    .Single();

student.Name = "Enoch";

await supabase.From<Student>()
    .Update(student);
In this example, we have fetched a student from the database, updated the name property and updated the record in the database. Supabase knows which record to update based on the primary key on the model.
Alternatively, you can use the following syntax to update more than one row at a time which allows you to specify the values to be updated without using a model for each of the records being updated:
await supabase
  .From<Student>()
  .Where(s => s.Name == "Brian")
  .Set(s => s.Name, "Enoch")
  .Update();
Deleting a record
Deleting a record is as simple as applying a filter with the where clause and deleting with the Delete method:
await supabase
  .From<City>()
  .Where(x => x.Id == 342)
  .Delete();
Relationships
All that is good, but it is a bit boring, let's add some relationships to the database and see how we can query it.
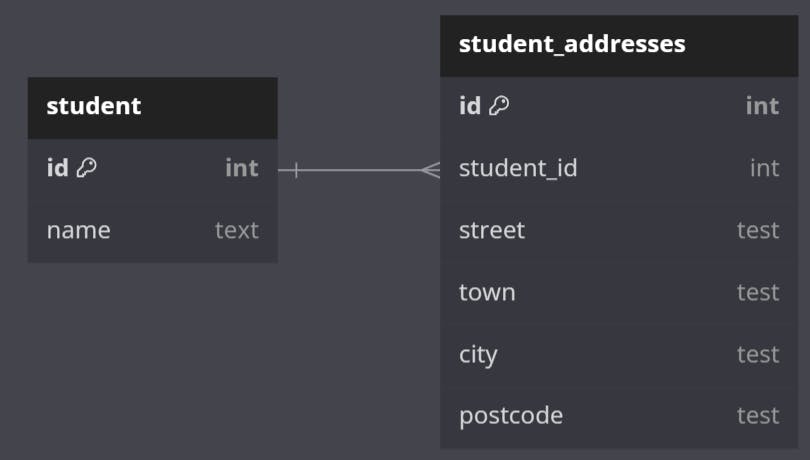
We want the students to have any number of addresses. Therefore it makes sense to create a student_addresses table and have a one-to-many relationship to it from the students table. Create a student_addresses table as below:

Use the 🔗 button to configure the student_id to relate to the id column on the students table. When selecting an option for Action if referenced row is removed select Cascade; indicating that the student's addresses should be deleted if the student is deleted.
Our database now looks like this:

We now need to create a model for the student_addresses table and associate it with the student model:
[Table("student_addresses")]
public class Address : BaseModel
{
    [PrimaryKey("id")]
    public int Id { get; set; }
    [Column("student_id")]
    public int StudentId { get; set; }
    [Column("street")]
    public string Street { get; set; } = string.Empty;
    [Column("town")]
    public string Town { get; set; } = string.Empty;
    [Column("city")]
    public string City { get; set; } = string.Empty;
    [Column("postcode")]
    public string Postcode { get; set; } = string.Empty;
}
In the student model add a reference to the addresse model. The property will be a list of type Address as one student can have many addresses:
[Table("students")]
public class Student : BaseModel
{
    [PrimaryKey("id")]
    public int Id { get; set; }
    [Column("name")]
    public string Name { get; set; } = string.Empty;
    [Reference(typeof(Address))]
    public List<Address> Addresses { get; set; } = new();
}
If we were now to query the students, we would expect to retrieve student models each with an empty list of addresses, but this isn't the case. Instead we will get absolutely no results. This is because the queries automatically created from the model will default to an INNER JOIN and so obtain students only where there is an associated address.
To force the addresses to use a LEFT JOIN we can update the reference as follows:
[Reference(typeof(Course), shouldFilterTopLevel: false)]
public List<Course> Courses { get; set; } = new();
Adding the shouldFilterTopLevel: false parameter to the reference attribute tells Postgres that we would like to fetch students even when they do not have any associated addresses.
What about a many-to-many join?
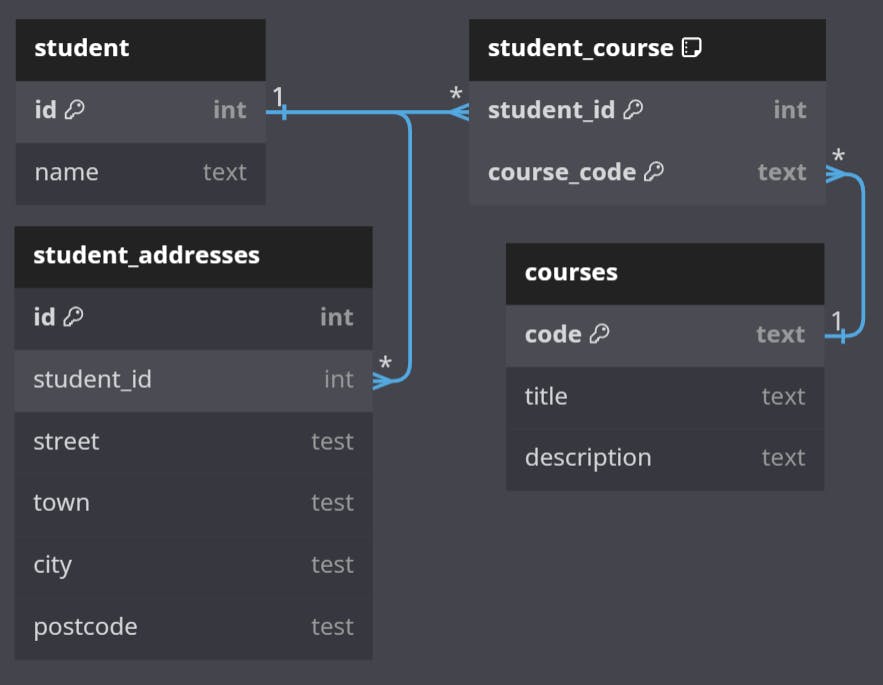
We want students to be associated with any number of courses. A student can have many courses and a course can have many students, so we need a many-to-many relationship, which is achieved by utilising a join table.
We will create two tables, a courses table and a student_courses table to handle the associations between students and courses.
Create the courses table like so:

Now we will need to create the student_courses table:

This table uses a composite primary key to indicate it is a join table. Use the 🔗 button to select the appropriate tables and columns for the relationships. When selecting an option for Action if referenced row is removed select Cascase. This will ensure the relationships are automatically deleted if a student or course is deleted.
The relationship diagram now looks like this:

We need to add a Course model to our Models directory:
[Table("courses")]
public class Course : BaseModel
{
    [PrimaryKey("code")]
    public string Code { get; set; } = string.Empty;
    [Column("title")]
    public string Title { get; set; } = string.Empty;
    [Column("description")]
    public string Description { get; set; } = string.Empty;
}
We now want to add the courses to the student model. Update the student model to look like this:
[Table("students")]
public class Student : BaseModel
{
    [PrimaryKey("id")]
    public int Id { get; set; }
    [Column("name")]
    public string Name { get; set; } = string.Empty;
    [Reference(typeof(Address), shouldFilterTopLevel: false)]
    public List<Address> Addresses { get; set; } = new();
    [Reference(typeof(Course), shouldFilterTopLevel: false))]
    public List<Course> Courses { get; set; } = new();
}
Here we have used the Reference attribute to indicate the relationship between the students and the courses. Supabase is smart enough to figure out how this relationship is configured, so you don't need to tell it how to map the correct columns and we don't need to create a model for the join table.
Again, we would like to select students that have zero or more courses associated with them, so we have to set the shouldFilterTopLevel parameter to false in the Reference attribute.
Overview
Congratulations on completing this beginner's guide to Supabase with C#! You've now gained a solid foundation to harness the potential of Supabase's backend-as-a-service capabilities in your C# projects.
By now, you've learned how to set up Supabase, create models to interact with your database tables, and perform essential CRUD operations seamlessly. Armed with this knowledge, you can streamline your backend development and focus on building remarkable applications that captivate your users.
Remember that Supabase has much more to offer. Dive deeper into its advanced querying options, real-time data synchronization, and authentication features to unlock the full potential of this powerful platform.
If you have any experience with Supabase, especially in C#, please let me know what you think.
Please check out these additional resources for Supabase C#: